Wednesday, October 12, 2011

Shabby Chic Shimmering Pumpkins and Gourds!

Morning everyone...here's wishing you all a fabulous and wonderful day!  I have a bit of shimmer and shine for you today (I only wish my pictures came out a bit better but alas no sun!) but I am showing you any way and hope you enjoy them!  They are easy to make and fun may I add!  If you have a shabby chic style going on they will bring you straight through the Thanksgiving holiday!  Hope you give them a try and I hope they bring you a smile!!!  ps...you rugs will glow like pixie faeries have visited!!!

One quick little note...Keren was so kind to make me a button for Krochet Kids...it is on my side bar so if you would like to snatch it and help spread the word that would be GREAT!!!!  hugs and enjoy!

Pumpkin, Gourds and Flowers...OH MY!!!


 We start with some pretty fake gourds and pumpkins...I know they are so pretty as is and I have a whole bunch of them in their natural state in the living room!

Now we get out our supplies...Modge Podge...your favorite color acrylic paints...some pretty flowers of your choice...glue gun and sticks...paint brush...wire and clippers and the star...crystal extra fine glitter (you favorite brand) It is so fabulous because you don't have to have all different colors of glitter...whatever the base coat color you choose will come shining through so it is like having a complete ultimate rainbow of colors!

 Now you base coat all of your gourds and pumpkins in your favorite colors and the stems in a pretty green and let them dry!  May I add you don't have to be exacting...the glitter covers a multitude of sins!  It is even fun to do a few different shades...EzPz!!!

Make yourself some curly vines with your favorite wire...just wrap...pull and viola!

Now all you have to do is paint your gourds with Modge Podge...Sprinkle with Glitter...let dry and then hot glue your little leaves and flowers and you have a pretty little gourd...keep on going till you have the amount you need and then have fun displaying them!  You can take these out each and every year!

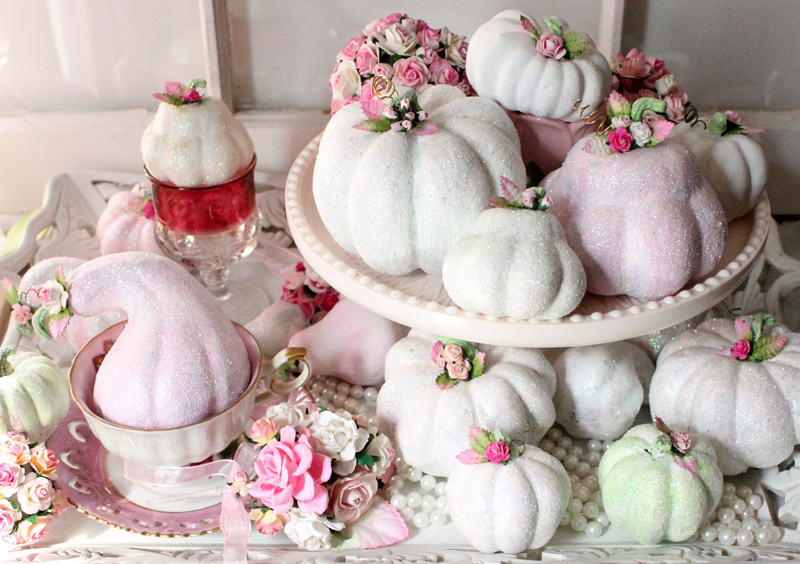
Maybe on a cake plate!


 Stack them up with all of your pretties!

 Just have fun with them and enjoy!  Hope you give this little project a try and mostly I hope you have fun doing it!

Hugs to all and see you tomorrow!


41 comments:

  1. I SO LOVE these! Your pictures are beautiful! Thanks for sharing :)

    ReplyDelete
  2. These. Are. GORGEOUS. Wow. I am blown away. They are so simple to make but they turn out EXTRAORDINARILY beautiful. Just stunning, Andrea. Really. I want to keep looking at them. :)

    ReplyDelete
  3. Wow, so pretty! I'd love for you to share at my linky party, it's still open: http://etcetorize.blogspot.com/2011/10/make-it-great-monday_09.html

    ReplyDelete
  4. Andrea~ these are GORGEOUS! Love it if you linked them up to the party that started yesterday.
    www.projectqueen.org
    xo

    ReplyDelete
  5. thanks for the kind words girls! i so appreciate it! sending hugs and i am all linked up! : )

    ReplyDelete
  6. So pretty! I love it! I'm your newest follower.
    Blessings,
    ~Wendy

    ReplyDelete
  7. Oh my GOODNESS those are so VERY pretty... Are you going to sell these..... Because I will buy one.... : )

    ReplyDelete
  8. ohhh my word! you told me they turned out pretty but you should have said they turned out GORGEOUS!!!!! SO posting this my love!!!! ah!

    ReplyDelete
  9. Andrea, you are pretty in pink!!!!! I love how you stacked them so beautifully on little platters.....wonderful job!
    ♥Michelle

    ReplyDelete
  10. Absolutely gorgeous! And thanks for the easy-to-follow tutorial!

    Mary @ Redo 101

    ReplyDelete
  11. I am so in love with this! Sparkles, pink???
    Thanks for sharing

    ReplyDelete
  12. Very nice blog and those pumpkins! Oh! They look like candy and are georgeous. I'll for sure be visiting you again! Greetings from Germany
    Charlotte

    ReplyDelete
  13. These are just gorgeous Andrea!! The photos are beautiful and are magazine worthy! You've got talent girlfriend!! Love and hugs, Jennifer

    ReplyDelete
  14. How fun! Love the little gourd in the teacup! Might have to try this, maybe next year.
    xoxo
    Joy

    ReplyDelete
  15. Beautiful! Can't wait to make these! Thanks for sharing. K

    ReplyDelete
  16. This is such a soft and creative look. I saw this highlighted on Free Pretty Little Things!

    ReplyDelete
  17. This is so gorgeous!! I'm going to try it.
    Thanks for the share!

    ReplyDelete
  18. I absolutely LOVE these!!! These are my kind of pumpkins! I want to make some! I have Mod Podge but I've never used it. I so want to make crafts with it!

    ReplyDelete
  19. OMGosh I ADORE these, Thank you for the TUT.
    I Love this vintage Victorian look,I am trying to move it into my 2 front room's both are bedrooms 1 i converted into a reading sitting room,DH took out the closet fixing it is now a bookcase TV stand,(if we move it can be put back)Thanks for the wonderful Ideas.
    Ann/alba

    ReplyDelete
  20. These look yummy enough to eat! Thanks for sharing them at my Bewitching Craft linky party!

    ReplyDelete
  21. I am sharing your fabulous tute on "Wednesday's Feature" at angela's sewing for sanity....I'll post your button so other's can come and visit you.

    btw...I just painted all of mine. I can't wait til they are dry so I can add all the pretty stuff :)

    ReplyDelete
  22. o.k....I couldn't wait til Wednesday! I had SO much fun doing this that I just had to share.

    Please visit my blog to read my post about these beauties :) (angela's sewing for sanity)

    Thanks again!

    angela

    ReplyDelete
  23. Hi Andrea - just wanted to let you know that I will be featuring your gorgeous glitter pumpkins from #4 link party - "turning the daunting into the do-able" Monday evening at www.projectqueen.org
    They are beautiful! Thanks so much for linking them up. Hope to see you on Tuesday for #5 party.

    ReplyDelete
  24. Wow! So pretty! I love the girly look!

    ReplyDelete
  25. Beautiful! They look so pretty, and so different from the 'before' photo! I'd be so excited if you would share these at my 'think pink' party!

    http://oneartmama.blogspot.com/2011/10/welcome-to-week-6-of-falling-for-crafts.html

    ReplyDelete
  26. Oh my word, these are fabulous! Would you mind if I shared them on my party/entertainment blog? We've been sharing pink pumpkins this month, for Breast Cancer awareness, and I'd love to feature this tutorial!

    THANKS!

    ReplyDelete
  27. hi Char -- how are you : ) please feel free to share!!! : ) hugs and welcome!

    ReplyDelete
  28. Super duper cute!

    Jenny
    www.simcoestreet.blogspot.com

    ReplyDelete
  29. Can i share this on my blog with a link back to yours? I just love this!!
    Thank you!

    ReplyDelete
  30. Oh my lord, Andrea these pumpkins are beautiful! Thanks for sharing the "tut"!

    Debie

    ReplyDelete
  31. I just found you through Holly over at Jeremiah Ave...and I am your newest follower. I LOVE this idea. They are just gorgeous! xo Diana

    ReplyDelete
  32. Oh gosh! Not only is this wonderful (because it is, I love the glitter in the glass and I'd love to know where you got the flowers)but you've given me the most wonderful idea for my Cinderella doll. Thank you, thank you!(New follower)

    ReplyDelete
  33. Do you know what the pattern name is of the pink tea cup you have with the cut outs on the saucer? I have one and want to collect them.
    Love the pink gourds and the glitter.

    ReplyDelete
  34. Hi Andrea,
    I found you through Holly at 2011 Jeremiah Avenue and I just became your newest follower.
    These are "STUNNING!" It is like a smaller version of what I think you would find at a White House dinner.
    They are just so very beautiful and yes indeed, I would leave them out through Thanksgiving.
    Thank you for sharing. I would take the small pumpkins and set at each table setting and apply a sweet tag with each person's name on it.
    I also grabbed your button and will display it
    hugs

    ReplyDelete
  35. These are GORGEOUS!!!! I did something similar with real pumpkins for my daughters October baby shower...but of course since they were real....we could only enjoy them for a short time! NOW...I can make these and use them over and over...YOU, Andrea, are a genius!
    Have a beautiful weekend!
    ;-D Kathleen

    ReplyDelete
  36. These are soooo pretty! Were they dried and sterilized first? I haven't a clue how to do that.
    Jil ♥

    ReplyDelete
  37. These are so CUTE in that Rudolph voice when he found out Clarice thought he was cute and then he took his first flight- I'm talking the Red Nosed Reindeer cute. They remind me of marzipan candies. TFS!

    ReplyDelete
  38. Oh I wish I found this post before Thanksgiving!!!

    ReplyDelete

LinkWithin

Related Posts Plugin for WordPress, Blogger...
Pin It button on image hover